
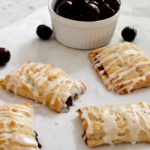
Cherry Hand Pies!
Cherry season is almost over but I can’t let it pass without sharing this delicious recipe for Homemade Cherry Hand Pies!

Some of you might find this hard to believe but I’ve never been a big fan of cherries. I know. That’s crazy talk, right?
Well, it’s true. That is until Michael and I took a week-long vacation a few years back to Michigan! It was definitely one of the most fun-filled, jam-packed with events trip we’ve been on, but one thing that REALLY stood out was when I took a bite of a freshly picked cherry at a local produce stand we stopped at.
These cherries were absolutely NOTHING like I’d ever tasted before. They were actually SUPER sweet! All this time I had thought ALL cherries were tart, almost sour like the ones we’d eaten fresh in Oregon. But we were to find out later from the owner of the farm that this definitely wasn’t the case!

Which brings me to the first lesson I learned when creating my homemade cherry pie filling!
taste your cherries ‘before’ adding sugar!
To make any homemade fruit pie filling, you will need to ADD some sugar ( or sugar substitute). Even though most fruit has it’s own natural sugars, it’s simply not enough to create the perfect texture and sweetness that a pie filling should have. How MUCH sugar is the question?!
Unfortunately, we weren’t able to take a trip to Michigan this year as planned, so I grabbed my cherries at our local grocery last week.

So before I added them to the pot I popped one in my mouth! They were ripe, but perfectly so(still a bit hard but deep red-almost purple in color) and although not as sweet as those we had eaten in Michigan, they were indeed sweet!
With this knowledge, the usual 1/2 cup of sugar I add could be cut in half! That way we will still have a sweet and yummy filling for our turnovers (or pie) but not OVERLY sweet! Because who likes that anyway?

lesson # 2-add a wee bit of citrus!
I say ‘wee bit’ because you definitely don’t want to overpower those delicious -sweet cherries! As for what kind of citrus? Unlike many of the recipes out there, I chose orange instead of lemon or lime!!! Why? Well, have you ever had Orange and cherry marmalade? How about Cherry and Orange glaze over ham? NO? Okay, you’re going to have to trust me on this! The combination is AMAZING, my friends!
Once your cherries, sugar, and orange juice (fresh preferably) has cooked down (about 5 minutes), you’re going to want to add in some cornstarch just to thicken it up a bit. Then remove the saucepan from the stove and add in some butter, and a smidge of vanilla! VIOLA! You now have homemade cherry pie filling!

Next comes the crust. And if you’ve ever been intimidated by making homemade, I’m here to tell you this crust is SO easy to make AND roll out that you won’t ever buy store-bought again! (Of course, you’re welcome to do so!)
All you need for this crust is flour, sugar (a wee bit) salt, shortening, water, and BUTTER!
I scream butter because it really is the MAIN ingredient in this buttery pie crust. It’s also the key to a light flaky crust. BUT IT NEEDS TO BE COLD!
So that would be my Lesson # 1 for the BEST pie crust ever! Ice cold butter. And shortening. And water too!

food processor or pastry cutter?
Either will do, but if you are going to use a food processor make sure you are only ‘pulsing’ the crust ingredients, not ‘blending’ until just combined. The dough will look dry but it really isn’t! Simply pour it out onto a piece of Saran Wrap or Parchment paper and wrap up tightly, pressing down a bit as you do.

Then let it sit in the refrigerator for at least 30 minutes.

Once the dough is chilled. I take it out and divide it into 8 portions. I roll each into a ball and place each onto a separate piece of Saran or Parchment-flattening the ball slightly as I wrap it up). Then I place all eight back in the refrigerator for another 30 minutes.
Why these extra steps?
Because again you want the pie crust dough to be COLD! The time it takes to roll the entire pie crust out and cut it into individual squares is just long enough to heat up your dough and THAT is something you don’t want!
When I’m ready to make the hand pies, I remove the individual pie crusts one at a time to ensure that the crust stays chilled!
Then place each flattened ball down on a floured surface. Cover with the Saran or Parchment it was wrapped in and roll it out until it’s about a 1/8″ thick circle. Then, using a pizza cutter, cut the dough into a 4″ x 4″ square.
Top each square with 1 1/2 Tablespoons of the cherry pie filling. Fold over one end, sealing by pressing gently down around the edges with a fork. Some of that cherry filling will spill out. No worries. It’s all good!
Just place each hand pie on a parchment-lined baking sheet-Brush them with a little bit of egg wash and in the oven, they go!

Let them back until they are perfectly golden.
But we aren’t done yet. See, remember when we talked earlier about overpowering the cherry pie filling with lots of sugar. Well…there is another reason we didn’t want to do that.

It’s because we’re adding just a teensy bit more with this creamy frosting! Of course, you don’t have to add it. (Wink, wink). But I highly recommend that you do. Because it takes these light and flaky, super delicious cherry hand pies to a whole other level of yummy!
Here’s the full recipe (frosting and all)!
Enjoy!
Cherry Hand Pies
Mini Pies made with a buttery-flaky homemade crust, sweet cherry filling, and topped with a creamy frosting!
Ingredients
For the Crust
- 2 1/2 cups all-purpose flour
- 2 tsp white sugar
- 1/2 tsp salt
- 1/2 cup shortening cold
- 1/2 cup butter cold or frozen
- 1/3 cup cold water ***+ 1 1/2 Tablespoons
- 1 egg ***FOR EGG WASH
- 2 Tablespoons water ***FOR EGG WASH
For Filling
- 2 cups fresh cherries pitted
- 1/4-1/2 cup white sugar **SEE TIP
- 1 Tablespoon Orange Juice (fresh if possible)
- 1 Tablespoon corn starch
- 1 Tablespoon butter
- 1/2 teaspoon vanilla
For Frosting
- 2 cups powdered sugar
- 1/3 cup half and half
- 2 Tablespoons melted butter
Instructions
-
Combine flour, sugar, salt, butter, and shortening into a food processor or large mixing bowl. ***If using a food processor pulse (don't mix) the ingredients until butter is pea-size. Add 1/3 cup + 1 1/2 Tablespoons of water. Again pulse-do not mix until just incorporated. The Dough will look dry. (That's okay). Pour the dough mixture onto a large piece of Saran Wrap or Parchment Paper. Gently press down until somewhat flat. Wrap tightly and place in the refrigerator for at least 30 minutes.
-
Meanwhile, combine the cherries, sugar, and orange juice in a medium saucepan. Cook on medium heat. When cherries begin to bubble, lower heat and allow to simmer for 5 minutes. Whisk in corn starch. Stir until the mixture begins to thicken. (About 1 minute). Remove the filling from the burner and add in the butter and vanilla. Allow to cool completely.
-
Remove the pie crust dough from the refrigerator and divide it into 8 portions. Roll each portion into a ball and flatten slightly. Place each disc onto a piece of Saran Wrap or Parchment paper. Wrap tightly and refrigerate for another 30 minutes.
-
Meanwhile, combine the ingredients for frosting and whisk until smooth. Set aside.
-
Preheat oven to 400. Remove one pie crust at a time. Place each crust on a well-floured surface or a piece of parchment paper lightly floured. Roll the dough out until it is approximately 1/8" thick. Using a pizza cutter cut the dough into a 4"x4" square. Top each square with 1 1/2 Tablespoons of the cherry pie filling. Fold one side over and seal edges by pressing down gently with a fork.
-
Beat the 1 egg and 2 Tablespoons of water to make an egg wash. Brush each pie with the egg wash.
-
Place each pie onto a parchment-lined baking sheet. Bake for 25-27 minutes or until golden brown. Remove from the oven and place on a baking rack to cool completely.
-
Using a spoon, drizzle each pie with frosting. Store in an air-tight container in the refrigerator.
Recipe Notes

Nutritional information for the recipe is provided as a courtesy and is approximate only. We cannot guarantee the accuracy of the nutritional information given for any recipe on this site
I know this recipe for Cherry Hand Pies has a LOT of steps! Especially for the pie crust. And I TOTALLY get that we don’t always have time to make a homemade crust.
The amazing thing about this crust is you CAN make it ahead of time and freeze it!
**Just divide the dough into the 8 portions, wrap each in Saran Wrap or Parchment paper, and place in a freezer bag. When you are ready to use, simply place in the refrigerator overnight to thaw!

You can also freeze these hand pies! Again, just thaw in the refrigerator overnight!
Serve them for dessert, a sweet snack, or even a grab and go breakfast!


Looking for more sweet treats?
Thank you so much for stopping by!
Stay Well!


How lucky you and your husband are to be able to eat so many sweets each week. Having a real life bakery in one’s home filled with cakes, cookies, and pies must truly feel like heaven on earth. I like the fact your blog embraces a steady diet of sweets and comfort food. Posh on those healthy blogs who needs them! lol Your hand pies look delicious.
Thank you so much, Meg! I LOVE to bake so yes, you will find many yummy baked goods here on the blog! But we also share a few healthy recipes from time to time that you might want to check out too! As for us eating everything I share here? LOL! Nope! To be honest, most of those baked goods go to our sweet neighbors. And some go to my mom, our kids, and one very pregnant niece with a sweet tooth! 🙂 Happy Friday!
I bet your home always smells wonderful. I know it is beautifully decorated I want to be your neighbor to come over sit at your table to visit a nibble
Aw…Thank you, Terrie! I would LOVE to be neighbors with such a sweet and talented lady as you! We’d have such fun!
Christine, these look amazing.
So hard to stay away from tasty treats so I’ve decided once in awhile it’s fine to take a little plunge.
We had cherry trees in our yard when I was a kid. My mom baked and canned but I always loved munching them right off the tree. LOL – so did the birds.
Growing cherries down south is tricky and just not something I’ve even ventured trying.
However we have our eye on some new land in another area and I envision a small orchard in my future.
Have a great week – follow the light and better yet be the light.
Hugs – Carole
Thank you, Carole! I totally agree! Life is too short not to enjoy a little sweet treat now and again! Having a cherry tree in my back yard would be heaven! Heck, ANY fruit tree in our back yard would be! LOL! I’m excited to hear about the new property! I’m praying we find some soon too! Need to get somewhere where I can spread my wings if you know what I mean! Have a fabulous week!
I’m so excited to try these Christine! They look so good. Thanks for the tip about the amount of sugar to add and the orange instead of the lemon too. I’ve never tried it before so I’m looking forward to this recipe. Hope you’re having a great week, CoCo
Thank you, CoCo! They are so yummy and that wee bit of orange adds just the right amount of sweetness! I hope you enjoy them! Hugs, Christine!