
DIY Challenge-Wood Plate Rack Hello, friends! A new month has begun and with it a new DIY challenge! A huge thank you to our wonderful hostess, Terrie from Decorate, and More with Tip for putting this fun blog hop together!
 If you’re stopping over from Celebrate and Decorate -Welcome! At the end of this post, you will find even more inspiration for creating with dowels!
I have to say, once again this challenge really started out being a CHALLENGE! Not because I couldn’t find any inspiration-(there is a TON of it) but because we’ve been downsizing before we put our current home up on the market!
Downsizing means not ‘adding’ to what you already have! Right?
So making something just to make it wasn’t an option. I needed to find something that I could actually USE in our current home, and also our future home. Then I came across, Medinia, over at Grillo Designs who shared four ways she created storage using dowels. Now storage is something we can all use more of. But there was one piece that definitely caught my eye over the others! A plate rack!
I could definitely use one to store extra dishes, and even for easy access for everyday plates!
Now I did put mine together a wee bit differently than Medinia, and I also decided to paint mine instead of keeping it bare wood. So let’s get started!
(Affiliate links are provided for your convenience. If you make a purchase we will receive a commission at no additional cost to you. You can read our full disclosure here.)
Material/Tools Needed to Make DIY Wood Plate Rack!
- Table Saw
- Drill (I used a Drill Press)
- 3/8″ Drill Bit
- (3) 3/8″x 48″ dowels ** Cut to 12″
- Scrap wood ( I used Pine) cut to size 3/4″ x 1 1/2″x 13 ( 4 pieces)
- Palm Sander
- Sandpaper
- Pencil
- Tape Measure
- Wood Glue
- Paint (optional)
- Paint Brush
- Clamps
- Rubber Mallet
how to create a DIY wood plate rack

cut your dowels and scrap wood to size:
You will need (14) dowels (7 for each side) cut to size to hold your plates. (The length of your dowels is totally dependent on what size plates you will be storing). Mine are larger than normal so I chose 12″ as my length. You will also need (4) pieces of wood for the base. ( These will be cut to size depending on how many plates you wish to store.) I wanted room for 6 plates so I made mine 3/4″x 1 1/2″ x 13″. To attach the two sides together you will also need (2) more dowels. I cut mine 5 1/2″.

measure the placement of your holes for the dowels on the two top pieces for your base.
I decided I wanted my rack to hold six plates, so I needed a total of 7 holes on each side. For the top dowels, I measured 1 1/4″ in from each end and marked. Then I measured 1 3/4″ spacing for the remaining holes. For the side dowels: I measured in 2 1/2″ from each end.

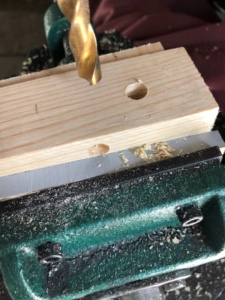
drill holes for the dowels on the two top pieces of the base
I used hubby’s new drill press, but a drill will work just fine. Since my dowels are 3/8″ that is the bit I used for both sides and top. 
sand all of your pieces
I used 60 grit sandpaper for the tops of each dowel and 80 grit sandpaper for the four pieces for the bottom of my rack. 
Glue your base pieces together
Glue the two drilled top pieces to the two bottom pieces with wood glue. Use the clamps to hold them in place until dry. (About 1 hour).
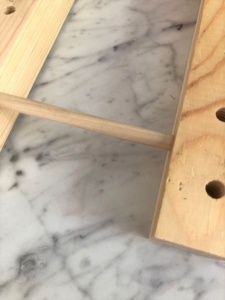
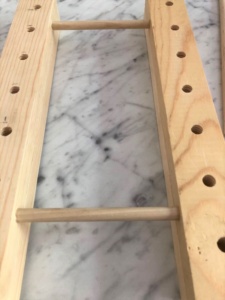
glue your side dowels into place
This can be done while the two base pieces are still drying. Just place a bead of wood glue on the end of the 5 1/2″ dowels and insert it into the side holes. They should fit snugly. Allow these to dry for about 1 hour.

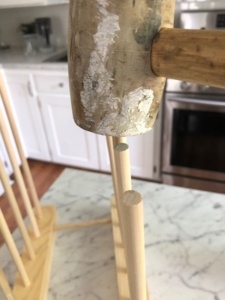
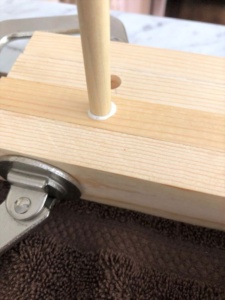
glue top dowels into place
Once the base and side dowels are dry you can go ahead and glue the top dowels into place. Again just place a bead of wood glue on the tip of each dowel and insert them into the holes. Then tap them gently into place with a rubber mallet. Allow drying for 1 hour.
At this point, if you prefer the natural look, you’re done! Just place your plates in the slots and you’ve got a functional way to display your pretty plates! But for me, I just felt my plate rack needed something more, so I decided to give it two coats of white paint. I allowed 30 minutes of drying time between each coat. After the second coat, I let it dry for another 30 minutes.
Then I gave it one coat of clear coat to prevent the paint from chipping or rubbing off onto the dishes.

Once that dried it was time to see how my dishes fit! I honestly couldn’t have been happier! Not only do my large everyday plates fit, but my smaller salad and luncheon plates did too!  Now all I need to do is decide where I want to set the plate rack! I’m thinking in the kitchen because it will be easier access for daily meals, but I like the idea of using it for entertaining (whenever that is) too, so maybe I’ll just make another one!
I hope you enjoyed today’s post -DIY Challenge-Wood Plate Rack! You can check out the links below for more inspiration! Next on the hop is Jodi from the House House!
Looking for more DIY Home Decor?


Thank you so much for stopping by! Don’t forget to stop by the links below for more inspiration!

We just downsides last October and I’m still trying to wrap my head around what to do with stuff! I love your plate rack! And those blue and white dishes? I had an entire set of 12 complete with every serving dish known to man when I first got married. I can’t believe I gave them away years ago. Wish I still had them…
Before I get to my comment on your great dowel rod project I want to say….you are moving? With packing and how busy you are with the moving you decided to take this challenge on….thank you!!
Now to your project. This is an item that all of us could use for different reasons. To display your pretty dishes or to use as a function drying rack, either way it is a great piece. Thanks for the clear tutorial. I am saving to make one of these for our home.
I love this! What a clever idea and it looks great too.
This was a challenge for me, too– because I didn’t want to look up other people’s ideas and just copy them…. and I had a hard time thinking of something on my own!! In the end, I did kind of copy something else…. oh well. Your plate rack turned out really nice! (p.s. did you have to alter the code to get your blog hop pics to look so nice? They’re all nice and straight! How did you do that?!)
This is such a creative idea!! I love this! I never would have thought of doing something like this with dowel rods. What a great way to display your decorative plates, too.
I know what you mean, Tammy! Downsizing here has been tough too! As for the dishes my Mom actually gave those to me. She didn’t have the full set but I sure do love the plates!
LOL, Not moving just yet, Terrie. But yes, we will be! Just trying to get everything organized in our current home so we can put it on the market! We had hoped to do it sooner but this pandemic kind of put a crimp in that. Love these challenges because it makes me think out of the box! Plus I get to use power tools! 🙂
Thank you, Jodi! It was a fun challenge!
Thank you, Liberty. I think it’s okay if you use someone else’s project as inspiration and make it your own! As for the photo’s yes. I had trouble inputting the code. The photos seemed too big and wonky and I couldn’t change it, So I just used my Photo Gallery plugin.
Thank you, Michelle! To be honest, me either! I have to give credit to the inspiration I found on Pinterest! It’s been awesome though and freed up some much-needed cabinet space!
I never thought of making one of these for myself, this is brilliant! I have seen (and shopped from) these at Home Goods. This would be a fantastic way to display some of my seasonal plates out on the counter! Pinned! Thanks for sharing!
Thank you so much, Chloe! This plate rack would be perfect for seasonal plates! I’m just loving the easy access it offers at meal time+ it opened up some much-needed cabinet space!
This is such a great idea! I’ve always wanted a plate rack! Now I can make one myself.
Thank you so much, Danya! I hope you have as much fun making yours as I did mine!
This plate rack is amazing Christine! I can’t believe this is a DIY and I’m so excited to try this now. I love how you can display so many different plates at once and how you can change it up seasonally too. Love, love, love! Hugs, CoCo
Thank you so much, CoCo! It was definitely a challenge but I was able to work with power tools so it was a learning experience too! I’m just loving the easy access it provides us with our every-day dishes. Now I just need to make another one for ‘fancy’ dishes! Have an awesome rest of your week, my friend!