
Dollar Store DIY Faux Mercury Glass Ornaments
Create high-end looking Christmas ornaments using Dollar Store items and a fun paint technique!
![]() Hello, friends!
Hello, friends!
Today I’m teaming up with nine other bloggers for another DIY Challenge, hosted by Terrie from Decorate and More with Tip! If you’re stopping over from Cloches and Lavender, welcome! Cindy is so talented and I just love all of her DIY creations!
Since the holidays are right around the corner, this month’s challenge is all about creating with clear ornaments. Of course, clear ornaments can be made from glass which is a bit more expensive, or plastic which is SUPER budget-friendly at any dollar store.
For those who follow along, you probably already know which one I chose. Plastic of course. Unfortunately, when I paid a visit to my local Dollar Tree to pick up a few plastic ball ornaments, they were all out! Oh well, I eventually found some at our local Dollar General.

They were 2 for $1!
The only probably- they weren’t like other clear ornaments which are all one piece and have a hole at the top under the cap. These, instead came in two pieces and without any decorative cap. Not exactly what I’d planned on when I decided what I wanted to do with my ornaments.

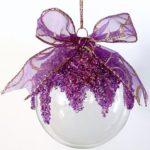
Which was inspired by these gorgeous Mercury Glass ornaments I found online! They were actually on sale, so not as expensive as I thought they’d be, and they instantly became the inspiration for my challenge! Of course, I wanted mine to be a bit more vintage glam which would be perfect for the tree in our dining room. Now all I had to do was figure out how to make the ornaments I had work!
what you’ll need to create your own DIY mercury glass ornaments:
(Affiliate links are provided for your convenience. You can read our full disclosure here.)

- Clear ornaments (same as those I used)
- Looking Glass spray paint
- Metallic spray paint (I used gold and silver)
- Spray bottle with one part vinegar-one part water
- metal ornament caps (if you use the clear ornaments I did) **TIP I had some I saved from broken ornaments but you can buy them pretty inexpensively at any craft store.
- E6000 glue
- Qtips
- black spray paint
- Gold glitter craft paint
- Gold Stretch Cord Ribbon
- Hairdryer
- Paper towel
The second challenge I had with this project was the weather. Since I was using paint (and smelly paint at that) I was forced to do so outside. Here in Minnesota the temperature was 35 degrees on the day I decided to create my ornaments. Since there was no warmer temperatures expected I went with it. But let’s just say it wasn’t exactly prime weather for bare fingers and taking photos so I didn’t capture many during the painting process.
creating the ornaments:
I’ve worked with the looking glass spray and vinegar water before so I was familiar with how it covered, and I’d seen how others used it to make ornaments too. I started out doing what most others had done. Which is to spray the looking glass paint on the ‘inside’ of the clear ornament, swirl it around, and adding a bit of vinegar water to give that vintage look. All the while blow-drying in between sprays. Then repeating until you have the look you want. Unfortunately I didn’t like the end result at all! The ornament still looked like cheap plastic and worse the line where the two sides connected was even more pronounced!
Not at all what I had envisioned. But it wasn’t getting any warmer outside. So I had to think fast! I decided I would experiment a bit and paint the outside this time.

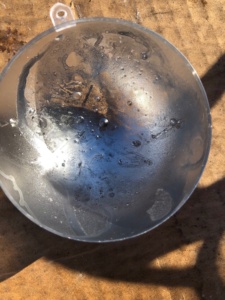
I started by spraying the looking glass paint on a small area of one side. Then I spritzed it with the vinegar water and finally dabbed it a bit with the paper towel to add some texture. Then I blow-dried it and repeated those steps-periodically swirling the paint instead of dabbing until both sides were covered.

After I allowed both sides to dry completely (20 minutes) I put them back together and was happy to see that the line where the two sides came together had disappeared in some spots. (See above) If it hadn’t been so cold I probably would have taken some extra time and layered a bit more of the looking glass spray on to blend away the line but by this time my fingers were about numb! So I moved on with the other ornaments.
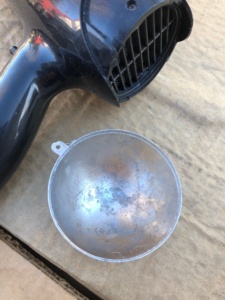
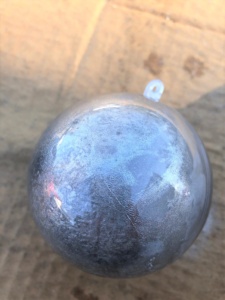
For the gold and silver mercury glass look:

This time I skipped the step of painting on the inside and just followed the steps to cover the outside (looking glass spray-vinegar water-blot with paper towel and dry with blow-dryer) until both sides were covered. Then I sprayed a bit more looking glass spray on and swirled it around to create a design in spots. Then I added in some gold (or silver) paint by spraying a bit here and there and again blotting with the paper towel to add more texture. Honestly, there is no right or wrong way to add the design. But it sure was fun.
how to add the ornament cap:
Again, as I mentioned my clear ornaments did not have the usual ‘cap’ as others do so I had to create my own.

I didn’t get photos of this process (sorry) but here are the basic steps:

- Lay your caps out flat and give both sides a light coat of black spray paint
- Once dry (about 20 minutes) use a Qtip and dab some gold glitter paint onto the top of the cap. Allow to dry 10 minutes or so.
- Place a dab of E6000 glue onto the top of the ornament where the two pieces join. Set your ‘cap’ down onto that piece and hold for 1 minute until the glue sets up.

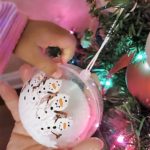
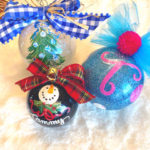
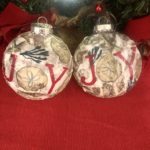
What I loved so much about these ornaments was that each one was unique. Even the two I did with just the looking glass turned out totally different based on how I swirled or dabbed the outside.

And they certainly no longer look like dollar store plastic ornaments! Right? Isn’t it remarkable what paint can do?

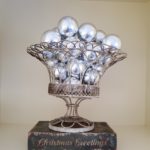
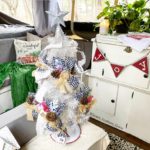
I hung a few of the ornaments up in our dining room tree and others will be displayed in an old vintage sleigh. For those I hung I simply tied a piece of the gold stretch cord around the top under the cap and VIOLA!
Since I had all the supplies but the ornaments, the total cost for 6 was just $3!!!
I hope today’s DIY Faux Mercury Glass Ornaments challenges and inspires you to create your own ornaments for your home!
Next up is Tammy from Patina and Paint! I can’t wait to see what she’s created! And don’t forget to check out all the other ornament inspiration too!

Thank you so much for stopping by!


Decorate and More with Tip|Purple Hues and Me|Cloches and Lavender|Pallet and Pantry
![]()

Patina and Paint|Paula’s Handmade Space|Stilettos and Shiplap|Sweet Southern Grace
It’s great crafting with you! Thankfully, I already had my ornaments from getting them last year and not doing anything with them. Glad you at least found the ones you did!
I also had trouble finding the Dollar Tree ornaments and bought the Dollar General ornament. Great idea on how to place the cap on the ornament to make it look more expensive. I will have to do that on mine as well, thank you for sharing.
I love the look of your ornaments. Looks so high end Christine!! Even in the cold temps you created an amazing ornament to share!
Your ornaments are stunning!! They look like high end ornaments form a department store!!
Wow, these turned out beautiful!
Christine you had me at Mercury glass. I have done this to glass but not ornaments. Thanks for sharing details.
Pinned. Would live to fins small clear ornaments fir these . I’ve never seen them.
Cindy
These turned out really pretty and unique. I have been wanting to try mercury glass ornaments for a long time now because I’m obsessed with mercury glass and they’re so expensive. I have all the supplies I need already except for the ornaments themselves so I need to get to work on it. Thanks for giving me the push I needed!
I’m so glad you liked them, Tara! Once I got the hang of it, it was actually quite fun to do!
Me too, Cindy! I think this would look awesome on those mini ornaments too! Thank you for sharing!
Thank you, Jodi!
Thank you so much, Shae!
Thank you so much, Terrie!
Me too, Liberty! Thank you!
I love how your ornaments turned out! They’re beautiful! And I can’t believe it was only $3 for 6!!
I’ve always loved the patina look of mercury glass and your ornaments look quite lovely, Christine! Such a pretty finish to add to ornaments!
I just love your little cute , inexpensive craft ideas , and this one looks like it is a pricey store brought ornament. We are not shopping around for ornaments this year , but have some plain leftovers like these , it is sure fun project with kids , thanks for sharing Christine!
Thank you so much, Michelle! I’m always amazed at what a little paint can do!
Thank you so much, Gail! I love the vintage look of mercury glass too!
Oh my goodness, you are so sweet, Aarthi! Thank you! I hope you and the littles enjoy creating!
That is amazing, Christine, these look just like real mercury glass ornaments. I’m definitely pinning this so I can try this for my trees next year. They’re gorgeous! Hugs, CoCo
Thank you so much, CoCo! It was one of those ‘anything’ goes kind of projects and I’m so glad they turned out like they did!
Your ornaments look amazing! They look just like the ornginal ones!
Thank you so much, Paula!
Question why no acrylic silver and use flowtrol. I don’t understand it is because you want all the different looks that water does?
Hello, Diane! This project was just a fun experiment that I tried using inexpensive items I already had. Thanks for stopping by!