
Easy 10 Minute DIY Valentines Day Wall Decor!
create super cute wall art for Valentine’s day in ten minutes and for under $5!!
Hello, friends!
I’m not going to lie. I’m not big on Valentine’s Day.
It’s a bit…commercialized if you ask me.
But, with that said, I decided this past weekend I’d add a few decor pieces as long as it didn’t take much time or $.
Because frankly, I don’t NEED to decorate, but this house is looking a bit bare after I put away all of our Christmas stuff earlier this month.
So…I started by looking in my craft stash to see if I had anything I could use.

Here’s what I ended up putting aside to ponder.
Affiliate links are provided for your convenience. These are products I use or recommend. If you make a purchase using one of my links we will receive a small commission. You can read our full disclosure here.)
- Wooden Beads I picked up at a local craft store clearance for 50¢. You could also buy a bag of the same size for cheap here.
- Faux flower stems
- Gold Wire
- Framed art from Dollar Tree
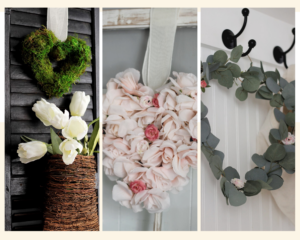
Since wooden beads have been SUPER trendy for quite some time now, and it looks like they aren’t going anywhere soon, I thought it might be fun to create a heart-shaped wreath with those I found.
how to make a heart-shaped bead & floral wreath
WHAT YOU’LL NEED:
- Gold Wire
- Faux Flowers
- Wood Beads
- Glue Gun
- Glue
- Bend the wire into a heart shape.
The wire I used was SUPER flexible so it moved around a lot. I found it hard to keep the exact shape I wanted so I decided to re-shape it after I had added the beads and flowers.

2. Add some beads.
I started by adding nine (9) beads to one side. Then I pushed them all the way to the bottom.

3. Add some flowers.
To do this I first cut the flowers off the stems. Then I placed a bead of hot glue on the bottom of the flower and pressed it into place on the wire. I used two different colored pink flowers to start.
Then I added seven (7) more beads and then one (1) flower. And then three (3) more beads at the end. Once the one side was done, I did the exact same thing on the other side.

4. Add a hanger
I first bent each end of the heart shape upwards to hold the beads in place. Then I attached another piece of wire to each end and tied them together to create a knot.
To cover the knot and decorate the hanger a bit, I added two flowers at the base and two smaller ones above them.

That’s it!

This sweet little heart-shaped bead & floral wreath took me just under 10 minutes to make and it cost me exactly $0!!
But if you don’t have any of the materials on hand you could certainly pick them all up at a local craft store and for one wall hanging it will cost you less than $5!!
how to make framed valentines wall art
WHAT YOU’LL NEED:
- Dollar Store Wood Framed Wall Art (They have these in Valentine themes now but you can get them any time of the year as well.)
- Wrapping paper (The possibilities are endless in color and print choices!) I bought mine at the Dollar Tree but you could also find some here.
- Stencil cut-outs
- Glue Stick
- Vinyl Lettering
- Faux Pearls
- Faux Flowers
- Burlap Banner (optional)
- Scissors
- Sandpaper

- Measure and cut the wrapping paper to fit the insert of the frame.
I did this by simply laying the wrapping paper inside the frame and gently pressing it down to highlight the edges. Then I removed the paper and cut along those lines.

2. Sand down the glittery lettering. Then clean the surface.
I first sanded down the glitter off the lettering before putting my pretty paper into place. This helped to avoid any bumps or grooves in the finished look. Then I wiped the surface down to ready it for the paper.
3. Glue the paper into place.
I used a glue stick and just lightly pressed some glue on each corner and the middle on the back of the paper. Then I turned it over and from the top corners began to slowly press into place. Making sure there were no creases until I reached the bottom. Then I took a dry cloth and pressed it down one more time to ensure it was in place.

4. Cut out your stencil shapes
So for those who are familiar with stencils, you’ll know that you need to ‘punch’ out the letter or shape first before using your stencil. Well…instead of throwing that shape away, I used it for this project. The pieces are lightweight cardboard so they held up well. And to add a bit of texture I traced one of the hearts onto a piece of burlap from a banner I had, and cut it out.
All in all, I used two pink hearts from one stencil set-one brown heart stencil from another set and one burlap heart that I cut out.
5. Glue your stencil shapes into place
I chose to set my shapes a bit off-center. First I glued the pink heart-then the burlap heart, next to another pink, and finally a brown heart. And then I added two ‘O’s to overlap the second and fourth heart!
6. Add your Vinyl lettering
To create the X’s I added two vinyl letters to the first and third heart-shaped stencil.
That’s as simple as it reads. Just press your vinyl letters onto the pink hearts.
7. Glue the faux pearls and faux flowers on.
This step is totally optional but I thought it added an ‘extra’ layer of texture and you all know how I LOVE that! So I first started by gluing the faux pearls onto the pink hearts. And then I added the faux flowers to the “O’s”.
That my friends is a wrap! ( Pun intended!)

Again, this DIY took less than 10 minutes to put together! As for cost-once again, I had all the material on hand. But…if you didn’t the total cost since everything I used I bought at the Dollar Store would be $5 or less!

This Valentine decor definitely fits with the softer-more neutral-toned color palette that I love so much. So I’ll definitely be using it in our current home and because I’m always thinking ahead-it will work wonderfully in our new home too!

I hope today’s post inspires you to look outside the box when creating home decor! Whether you find something you can use in your stash of craft supplies, junk drawer, or you buy it inexpensively at the Dollar Store, challenge yourself to re-invent, re-purpose, or re-imagine.


Looking for more Valentine’s Day inspiration?


SHOP THIS POST
[show_boutique_widget id=”1115612″]
Thank you so much for stopping by!
These are cute ideas Christine,
I love the wooden bead thing they just make everything look so clean and inviting.
Simple you know, that works for me. Well I’m back to writing today and hope your day is awesome.
Hugs, Carole
Hi Christine,
These are very pretty. I don’t decorate too much for Valentines day either.
Love the sign it doesn’t scream heartland to cutesy.
Beads are a big trend too and your hearts is pretty and you can’t beat free.
Cindy
Thank you so much, Cindy! I’m so glad you liked them! They truly were so fun to create!
Thank you so much, Carole! I’m a huge fan of wooden beads too, my friend! It’s all about SIMPLE this year! In fact, maybe that should be my word of the year, LOL!
This is so cute and super creative too, Christine! What a great way to warm up winter and celebrate Valentine’s Day. Hugs and pinned, CoCo
Thank you so much, CoCo! I’m so glad you liked them! They were fun to put together!
Both of these are so cute! I just love the wood bead heart!
I’m not big on decorating for Valentine’s Day, either. Or the entire holiday. Although, I can always go for the chocolate! LOL
Thank you so much, Michelle! The wood beat heart is my favorite too! I’m right there with you on the chocolate! It’s actually the BEST part of Valentine’s day in my book! 🙂