
DIY Rustic Mini Christmas Tree Centerpiece!
create a rustic Christmas centerpiece using dollar tree mini trees!
![]()
Hello sweet friends, and Happy Wednesday!
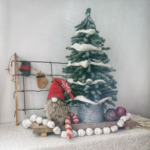
If you’re coming from Danya’s Just another Farmhouse blog- WELCOME! I just LOVE how she decorated her mini trees! And her pretty centerpiece just warms my heart!
We are so glad you stopped by and we hope you find a wee bit of inspiration here at CD’s Country Living!
I have to say I was SUPER inspired and excited when Terrie, the author of the blog, Decorate, and More with Tip asked me to join her DIY Challenge a couple of weeks ago! I recently found Terrie and all her lovely squares over on Instagram and felt a true kinship with her almost immediately! Terrie is hosting this fun DIY challenge and I’m so humbled to be joining her and some other amazingly talented bloggers who will be sharing creative decorating ideas using these Dollar Tree mini trees(or ones similar)! You can find all the wonderful inspiration in the links at the bottom of this post!
Now onto today’s project!
I’ll be honest! When I first caught a glimpse of these mini trees at my local Dollar Tree I couldn’t help but be a bit concerned. They are…cute…in a very inexpensive faux kind of way. But they aren’t exactly designer-looking, am I right?

And it doesn’t get much better when you fluff it up a bit either!

Charlie Brown would love this tree. Me? Not so much, but that’s what made this a challenge, and a fun one at that!!
I chose to create a rustic Christmas centerpiece with my mini tree (s) with the hope that I could keep it up all winter long!
So let’s get started!
Materials/Tools needed
(Affiliate Links are provided for your convenience. You can read our full disclosure here.)
Dollar Store mini tabletop trees
Additional faux branches or garland ( I used an old tree and garland I had on hand) **You can also pick up a package of garland stems at Dollar Tree
Wirecutter
Spray Snow (Dollar Tree)
(3) Metal buckets ( I found mine at Walmart for $2.97 apiece)
Glue Sticks
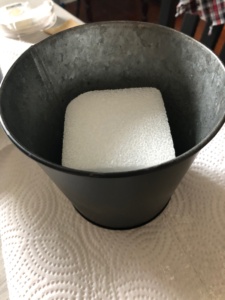
Styrofoam blocks (Dollar Tree)
Black Spray Paint flat or matte finish
Ribbon (I used a black and white plaid I found at Walmart)
Wooden Script Ornaments (I found mine in the Christmas aisle at Walmart)
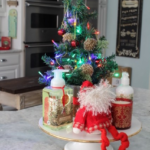
How to Create A Rustic Christmas Centerpiece!
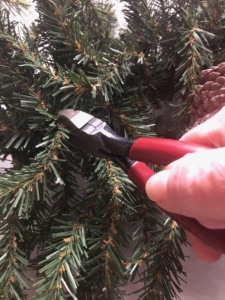
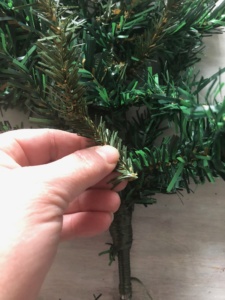
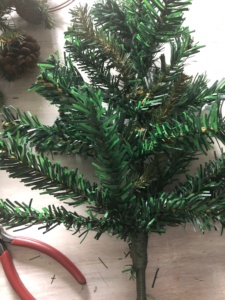
Step One: Fill in the tree with more faux branches.
This step is totally optional but since I was going to flock my trees anyway, I figured no would see that the branch colors don’t match, so why not? The more fuller the tree the better!
Step two-spray paint trees with white paint
This is a little easier said than done. The tree isn’t the sturdiest and since it was windy when I chose to paint outside to avoid filling our house up with fumes-it ended up falling down several times during this process. The good news is it held up well!! 🙂 Once painted, I brought the trees inside and allowed them to dry completely. (About 2-3 hours or overnight if possible.)

Step Three-Spray with faux snow
Again, I would definitely do this step outdoors and DEFINITELY not on a windy day!! I would also recommend you have something around and under the tree. I did NOT use a lot of this spray as it is messy. It will also NOT dry if put on heavily! Basically, I just sprayed a light coat on top and the underside of some of the branches just to give them that flocked look that’s so popular! Once I had the look I wanted I brought the trees inside and let them dry overnight.

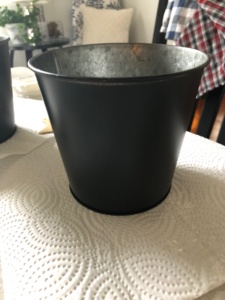
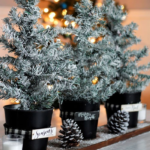
STEP four-Paint and decorate the buckets
I first gave each bucket a light coat of black spray paint. I let that dry for 1 hour and then applied one more light coat. Once that dried (about 1 hour) I placed the Styrofoam square inside the bucket and then it was time to decorate.
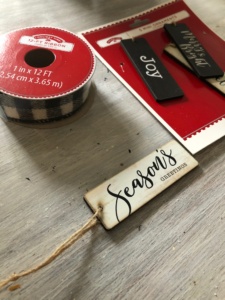
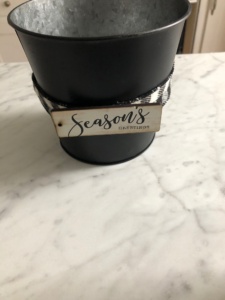
I measured and cut enough ribbon to wrap around each bucket. Then I used my glue gun to glue them in place. Next came the ornament, which I just centered on the ribbon and glued into place.
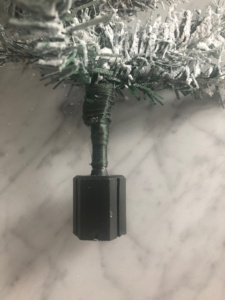
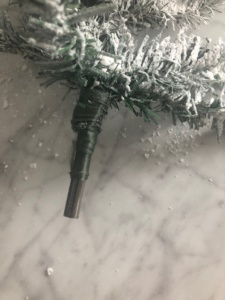
Step five-remove the end from your mini tree and insert it into the styrofoam in the bucket.
The tree comes with its own stand so you will need to remove the end that the arms for the stand fit into. Then gently press the new end into the styrofoam inside the bucket.
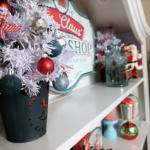
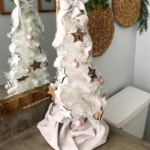
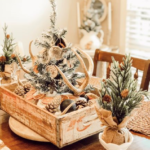
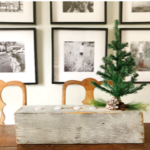
Once my trees were completed it was time to pull the rest of the centerpiece together! I did this by placing a piece of stained wood in the center of my table. Then I placed the trees in their rustic Christmas buckets on top. In between each, I placed a frosted pine cone. And on each end a simple white candle.

And last but not least I sprinkled a bit more faux snow around the bases of the buckets to add a touch more whimsy!

I LOVE how each one has its own Christmas message now, but when Christmas is over I can just remove the ornaments and keep the trees up all winter long!

Since I had all of the other materials on hand the total cost for this Rustic Christmas centerpiece was just $16!

So now the question is…what would you do with the Dollar Tree mini tree? I’d love to hear your ideas!
SHOP THIS POST

And don’t forget to check out the links below for more inspiration!! Next on the list is Dani from The Taborhood!
SHARE THIS POST♥

DIY CHALLENGE-MINI CHRISTMAS TREES!!!
(Click on the photo’s and you will be taken directly to each inspiring post!!)


You can find more of our decorating inspiration here!!!
And check out some more Popular Christmas DIY’s!!!


I hope you’re all inspired to accept this DIY challenge and go pick up a few of your own Dollar Tree mini trees!!!!
Happy Creating!

Reading your post one could tell that you were not impressed with Dollar Tree. I take it that was your first time shopping there? I admire the fact that you tried your very best to create something out of the cheap, tacky, plastic tree you found. Flocked trees look alright from a distance but they are messy and usually pretty toxic smelling from all the chemicals used on them. I wonder if these rustic trees will store well? Or will you find them next year squished to pieces in a pile of white paint chips? I felt that the project you completed wasn’t very frugal or budget friendly in that the trees cost $3.00 but it took an extra $13.00 to make them look halfway decent.
I don’t shop at the Dollar Tree because most of the stuff there is one use and I would rather save my money to buy nice things that I can use for a good long time and eventually pass on to my granddaughter. That said I fully understand that people are on strict budgets and often cannot afford more expensive things. To answer your question no I cannot accept the challenge to go into Dollar Tree and buy the little plastic trees. I saved and bought a beautiful galvanized metal tree from Pottery Barn that I’m using this year for my centerpiece. Let us know how your centerpiece works out and how you plan to store it. Greetings from Sarah in CT!
These are so cute Christine… I’m seeing that flocking is big this season. I like how you placed them on the wood and added a few pine cones. Perfect way to complete this piece. My mom was big into Christmas decorating and I remember there was a three year stretch where each year at Christmas we had a flocked tree.
I love the idea of adding more branches and those buckets are soooo cute!
Thank you so much, Carole! I’ve never had a large flocked tree but I do so love these mini trees all pretty and frosty!
Hello, Sarah from CT! I do shop at the Dollar Tree and other Dollar stores quite frequently. I just LOVE their dishes, glasses, candles and craft supplies!! These trees were a bit inexpensive looking yes, so I did spend a bit more to improve the look, and I’m quite satisfied with how they turned out! I’m so sorry you didn’t find my project inspiring but we all have different tastes and that truly is what makes each of us unique and special!! As for the flocking, some folks like it and some don’t. I’ve painted and flocked other small trees and even garland and have never had any of them chip, but I will surely update this post if that is the case with these. I plan to store the trees as I do all of my Christmas decorations on a shelf in our basement. Enjoy your metal tree! It sounds lovely! Wishing you and yours a blessed Christmas!
Thank you so much, Tammy!!
These are absolutely beautiful! I love how you put the snow on them. And the buckets are so cute!! Now I want more trees! 😀
Your trees turned out great and look perfect with your decor. I wish I had thought to spray paint mine first. So smart 🙂
Christine, your centerpiece looks amazing. I think you did an awesome job transforming the pitiful trees to something so beautiful as your centerpiece. I love the tutorial you shared with us as well. I never thought about spray painting them and then spray the can snow on top. Great idea.
Regarding Sarah from CT’s comment. I agree that some of the Dollar Tree items are not high quality but what do you expect for a buck. I love transforming their items into “HACKs” from other high end retailers. With a little imagination and work it can be done with the right Dollar Tree items. I do walk pass the “junk” items.
Thanks for joining in on the Christmas tree Challenge. I love working with you. Happy Holidays!
Thank you so much, Michelle! After seeing all the gorgeous inspiration you gals shared I want some more trees too!!
Thank you so much, Danya!
Thank you so much, Terrie! I totally agree with the Dollar Tree items! There are so many I love purchasing and others, I walk on by! Thank you again for inviting me to do this challenge! It was so much fun and I LOVED working with you too!!!
I love how you transformed these little trees on a budget! I would love to have this display out on my table.
Thank you so much, Mary!!
These look great! I love the look of the white trees in the black buckets and what a great idea to add some extra branches!
I love your gorgeous trees! And I never thought to fill in the tree with more branches- brilliant!
Great job and I love the way they look !
You did a wonderful job and what I love is that the style can fit into most people’s table scape!!
So cute and pretty!!!
Teresa
Thank you so much, Teresa! This was a fun project for sure!
Thank you so much, Jessica! The way you decorated yours so lovely you really didn’t need to!! Blessings!
Thank you so much, Dani!!
Stopping back to say that I apologize for being so harsh and judgmental about your project. It is clear to see from looking at your DIY projects that you are very creative. Everyone is different and thank goodness for that-you are right 🙂 I have never been too fond of Dollar stores not so much because of what they sell but more for personal reasons. A lot of family owned stores in our community closed due to their rising popularity and prices. Our family owned store went right along with them three years ago . I also felt my comment was quite snotty and it wasn’t intended to be that way. You inspired me to send my centerpiece back to PB and make a trip to Target and yes find some cute $3.00 plastic trees and decorate with them. It felt great to create vs. always clicking buy it now and taking delivery of something. So thank you! You’ve put a lot of work into your projects and blog and it shows. Enjoy your weekend. Sarah
I love flocked trees and yours turned out beautifully! I also love how you can use them all winter long!
Thank you so much, Shae! I’m a huge fan of flocked trees too!
Thank you so much for your kind words, Sarah, but no apology is necessary! We all have different likes and dislikes and I value each and every one of my reader’s opinions. Whether for a project or against. I am truly so sorry to hear about your family business closing. It saddens me because we’ve seen a lot of that here in our local area too. Many of the brick and mortar stores have been forced to close because they just can’t compete with the online experience and pricing. That’s why I think it is so important for us all to do our part and shop local small businesses’ as much as possible. Enjoy your new centerpiece and happy creating! Blessings, Christine!