
DIY Pottery Barn Inspired Earthenware Vase
how to create a high-end earthenware vase using drywall compound and paint!
Hello, friends!
I decided this week to take a couple of days off from our bathroom remodel.
Sometimes you get so involved in a project that it consumes every waking moment. When that happens it’s time to step away and clear your head.
To clear my head and keep my creative juices flowing, I decided to work on a few projects I’ve had on the back burner for a while.
Things are opening up around here, but I’m still not super comfortable going to my usual thrift stores, etc. Instead, I’m trying to come up with projects that use what I already have. Hopefully, these projects inspire you too!!
Today I’m going to share one of those projects!

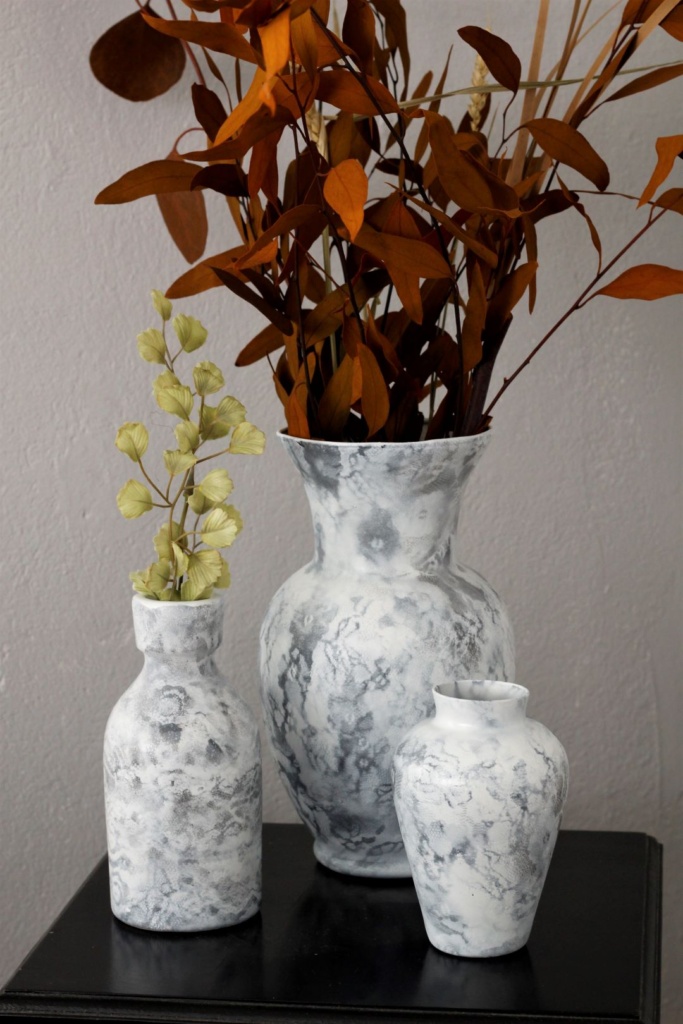
I’ve been wanting to test this idea I had for re-creating this gorgeous vase (the one on the far right) I found online for quite a while now. For those who follow along, you all know how I LOVE a good knock-off project. ( Here is another vase I did last year, and a mirror I did this past spring.)
Pottery Barn is one of my favorite online sources for decor. I just LOVE everything they have. I also LOVE vases! Because regardless of season, our home is always filled with fresh flowers. They make me happy. What can I say?
The vases I found at Pottery Barn were just stunning, but they ranged in price from $80-$140! Not that they aren’t worth every penny since they are hand-painted earthenware. But still.
My budget side just couldn’t see spending that kind of $$ on a vase. So I wondered if I couldn’t make one myself.
Of course, I’ve seen so many DIY reproductions of this kind of stoneware on Pinterest, but they all call for Plaster of Paris, which I don’t have on hand. They also call for DIRT! Yes, you read that right. DIRT!
I’m sorry. Although I’m a HUGE fan of getting my hands dirty in the garden (I never wear gloves), I’m not a fan of making decor out of it.
But there is something I ALWAYS have plenty of around this house, and it’s SUPER easy to work with!
(Affiliate links are provided for your convenience. We will receive a small commission at no additional cost to you if you make a purchase. You can find our full disclosure here.)

We ALWAYS have a huge bucket of joint compound on hand because every room in our home has needed new drywall! You can buy a much smaller jar of this compound at your local big box store, hardware store, or here, if you’re like me, and try to do most of your shopping online!
I actually came up with the idea to use the joint compound (or drywall goo, as I call it), to create my textured vase while Michael was drywalling our bathroom.
The drywall goo spreads so easily, and since it takes a while to dry (like 24 hours) there’s time to manipulate how you want it to look. That seemed like the perfect material for this project, so I gathered all the other supplies I needed and decided to test my idea.
materials and supplies:
Clear Glass Vase (I bought mine pre-pandemic at the Dollar Tree)
Primer ( I brushed mine on but you can use a spray too.)
Paint (I used beige, grey, white, and black)

step one- wash and dry your vase with a vinegar + water solution.
You’ll need to prime your vase first, so give the vase a good cleaning with a vinegar-water solution or another good glass cleaner.

step two-give your vase one coat of good primer
I figure like paint the drywall was going to need something to stick to, so I gave my vase a good coat of primer. I’m not sure if this was necessary, but it did take the glossiness off the glass. Which did seem to make the application of the drywall compound easier!

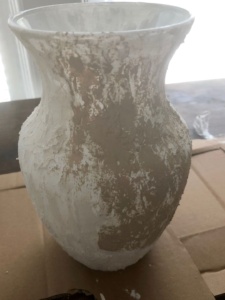
step three-apply your drywall compound
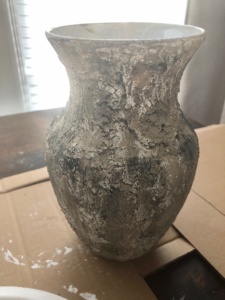
Remember when I said I don’t mind getting my hands dirty? Well, I don’t. This is why I used them to apply the compound. I’m sure you could use a plastic drywall spatula or plastic knife or some other tool. But I found my hands did the best job of spreading the compound how & where I wanted it.
***I used about 1/2 cup to 2/3 cup of drywall compound for the size of the vase. It all depends on how much texture you want.
step four- allow your drywall to dry.
The instructions on the side of the drywall compound container say 24 hours. Of course, that applies to drywall application, not vase application. All it took for my compound to be dry enough to paint was about 1 hour.
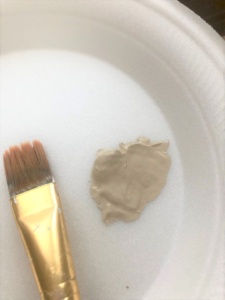
step five apply a base coat (beige)
To achieve the look that I wanted, I started by applying a light coat of my beige paint over the drywall compound. I did this by tapping the brush over the vase. Like you would do to remove any excess paint. I allowed that to dry for about 20 minutes.
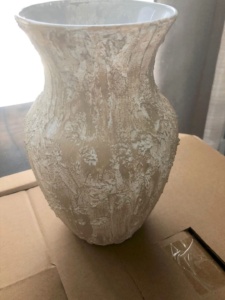
Step Six uses the same ‘tapping’ paintbrush effect, add in the other colors. (Grey first, then black, and then white.)
This time you don’t need to wait for each color to dry. It’s all about how you want the texture to look. I started with the grey, adding more of that than the white and black but not as much as the beige. Then I added just a wee bit of black, and since the base was white, I added an even smaller amount of that. Then I allowed that paint to dry for 30 minutes.

step seven-brush on a ‘very’ light coat of the beige paint
I know this sounds redundant, but doing so gave me the EXACT look I wanted. The ‘added’ beige-toned things. But more importantly, by ‘brushing’ it on, it softened the look of the compound and blended everything together. ** I allowed this last coat to dry overnight.

step eight- apply a clear coat to seal
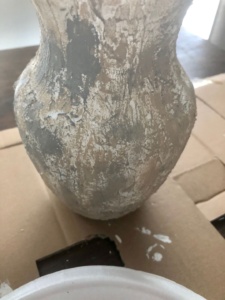
Once the paint and drywall have dried overnight, you will notice that your vase is a bit lighter. The areas where I did not paint over the compound lightened once it dried completely. That is what I was hoping for because that is what happens when the compound dries on drywall. If you are satisfied with the way your vase looks, then it’s time to seal it! I gave mine two light coats.

Overall, I was extremely pleased with how this ‘test’ of mine turned out. I really like all the texture the drywall gave the vase. And even better, I love the aged stone look the paint provided.

Here’s a side-by-side view. Again, my inspiration was the far-right vase. Not an exact replica of course, but not too shabby if I say so myself!
Total cost for my Pottery Barn-inspired vase? $0!! And I’m loving it so much that I can’t wait to make another one! This time I think I’ll go darker. Maybe Black or Navy Blue? I guess I’ll just have to go to Pottery Barn and do some shopping– I mean look for inspiration. 🙂

I hope YOU were inspired by this budget-friendly and SUPER easy DIY project!
So grab a vase and some drywall goo and let’s create!


Looking for more Pottery Barn decor dupes?
MORE BUDGET-FRIENDLY EARTHENWARE VASES WE LOVE!
[show_shopthepost_widget id=”4715956″]
Thank you so much for stopping by!

Christine this is BANANAS! I cannot get over how this looks IDENTICAL to the Pottery Barn vase! That is SO cool! I never even knew you could do this type of thing but I am beyond excited to try it now. I also came across an article where they used flour which blew my mind too. Super excited about how this came together Christine, it’s absolutely amazing. Pinned and will definitely share too! Hugs, CoCo
Thank you so much, CoCo! It was really such a fun experiment and I’m so glad it turned out! And flour? Now that one I HAVE to try! Thank you so much for the share! Have a fabulous Friday and weekend! Hugs!
This turned out fantastic Christine, it looks like a found piece of pottery. Great tutorial too!
I have done similar projects years ago and we always have joint compound around too.
Pinning
Cindy
Thank you so much, Cindy! It was a SUPER fun ‘experiment’ and I’m so glad it turned out the way I imagined! Joint compound is a dream to work with! I can’t wait to make another one!
This is magnificently beautiful Christine. Bless you, for coming up with such fabulous ideas and expelling your creative juices. Loved the artistic and the rustic beauty this is. I love how you have flowers around all the time. I’m a flower fan too!
Oh my goodness, Thank you so much, Hasin! It truly was a fun project to do, and yes, I absolutely LOVE having flowers around!! They make me smile and we need more of that right now, yes? Have a blessed week, my friend!
All I can say is OH MY GOSH! This turned out so amazing. It looks just as good as the high end pottery pieces. You just gave me a project to do. I am on the hunt for some boho style vases and the prices are so expensive. This is exactly what I have been looking for. Thank you sweet friend for the inspiration.
Thank you so much, Terrie! I’m so glad you liked it! It really was just an experiment and I’m over the moon happy so many thought it inspiring! I’ve already got plans to make another one in black I think! A bit moody for fall!
AWESOME transformation!! I’d love for you to share over at our weekly Wednesday Creative Crafts Linky Party https://creativelybeth.com/creative-crafts-linky-party-8-join-in-the-fun/
Have a great week!
Creatively, Beth
Thank you so much, Beth! I will be sure to check out your party! I appreciate the invite!
I’m so impressed with your vase and like it even better than the inspiration. Your post will be featured this week on the Tuesday Turn About Link Party and I hope you will stop by to link up again.
Oh my goodness, Michelle! Thank you so much! That means a great deal coming from someone as talented as you! I will definitely stop by your party again! It was fun to see so much inspiration!
Christine – your vase turned out so well. It is fabulous! Your color choices are stunning & I look forward to seeing what you do with darker colors. One question – did you add joint compound to the visible inside(the top) of the vase or did you leave it as it was knowing you were adding greenery?
Thanks again for the wonderful tutorial. Bravo! xo
Thank you so much, Audrey! I’m so glad you liked the project! As for the inside of the vase? No, I did not add any joint compound to the inside. You certainly could if you wanted to though. I hope you enjoy your vase as much as we’ve enjoyed ours!
Hi, I was told that joint compound would crack, I’m curious how your vase has held up so far?
Hello, J! Thank you so much for your question! That vase is seriously one of my favorite DIY projects and I use it ALL the time! I’ll be sharing some updates in a future post on this and other DIY’s but the answer to your question is: The vase has held up exceptionally well! No chips or crack! I have noticed the color has lightened even more than before but other than that no change whatsoever! Hope that helps!